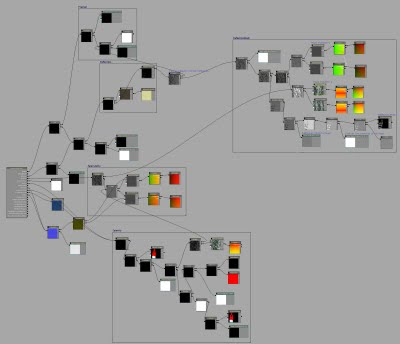
 This is the shading network used for the water in the waterfall scene. Its broken into several sections. I approached this in shading network in layers. I first worked on the reflection. The reflection uses a cube map that was generated in UDK. Currently the SceneCaptureCubeMapActor is broken in DirectX 11 so I needed to switch to DirectX 9 to create the cubemap. The process is rather simple.
 - Place the SceneCaptureMapActor into the scene
- Create a TextureRenderTargetCube texture in the Content Browser
- Assign the Texture to the SceneCaptureMapActor that was placed in the scene (F4>Scene Capture Actor> Capture> Texture Target)
- In the content browser right click on the TextureRenderTargetCube and select Create New Static Texture.
Once the cube map was made the next step was creating the reflection mask. The reflection mask is the main aspect of creating the illusion of motion with the water. I used a noise texture and a water texture with a Panner node. Each Texture was panned at varying speeds and was tiled slightly different. This created enough variation to make the water look believable. Half of this reflection mask was output(ed) to Specularity and multiplied to another version of the panning noise texture. The noise texture was created in photoshop using the noise filter.
Fresnel was combined to the mask to control the angle of reflection and it was also used to enhance the base color with a Scalar Parameter to control the intensity of the Fresnel.
The reflection was created using the cube map texture with Reflection Vector node plugin into the UVs. This was multiplied with the mask which would control where the reflection would and would not show.
Opacity used some features that were used to gernerate the reflection mask but, this was combined with DestDepth and PixelDepth (DestDepth - PixelDepth )/integer. The integer was made scalar to control the results. Because the depth used in the water was very shallow, the lower part of the water fall became completely opaque hiding the rocks behind it. To counter this I created a mask which was then multiplied to the results of the DestDepth/Pixel Depth calculation. This allowed the lower part of the water fall to return to the previous transparency. A Scalar Integer was added to control the intensity of this mask.
The reason the texture mask is red, white and blue is because I would at times create more than one mask and place these masks into different channels reducing the amount of textures I need to import into the engine.
And finally, the normals were generated from the specularity by using the Append node to create a normal map.
Because the Panner node only (as far as I know) allows for the texture to be moved in one direction, the UVs for the waterfall needed to be adjusted so that the key areas would show the water moving along the geometry correctly.

No comments:
Post a Comment